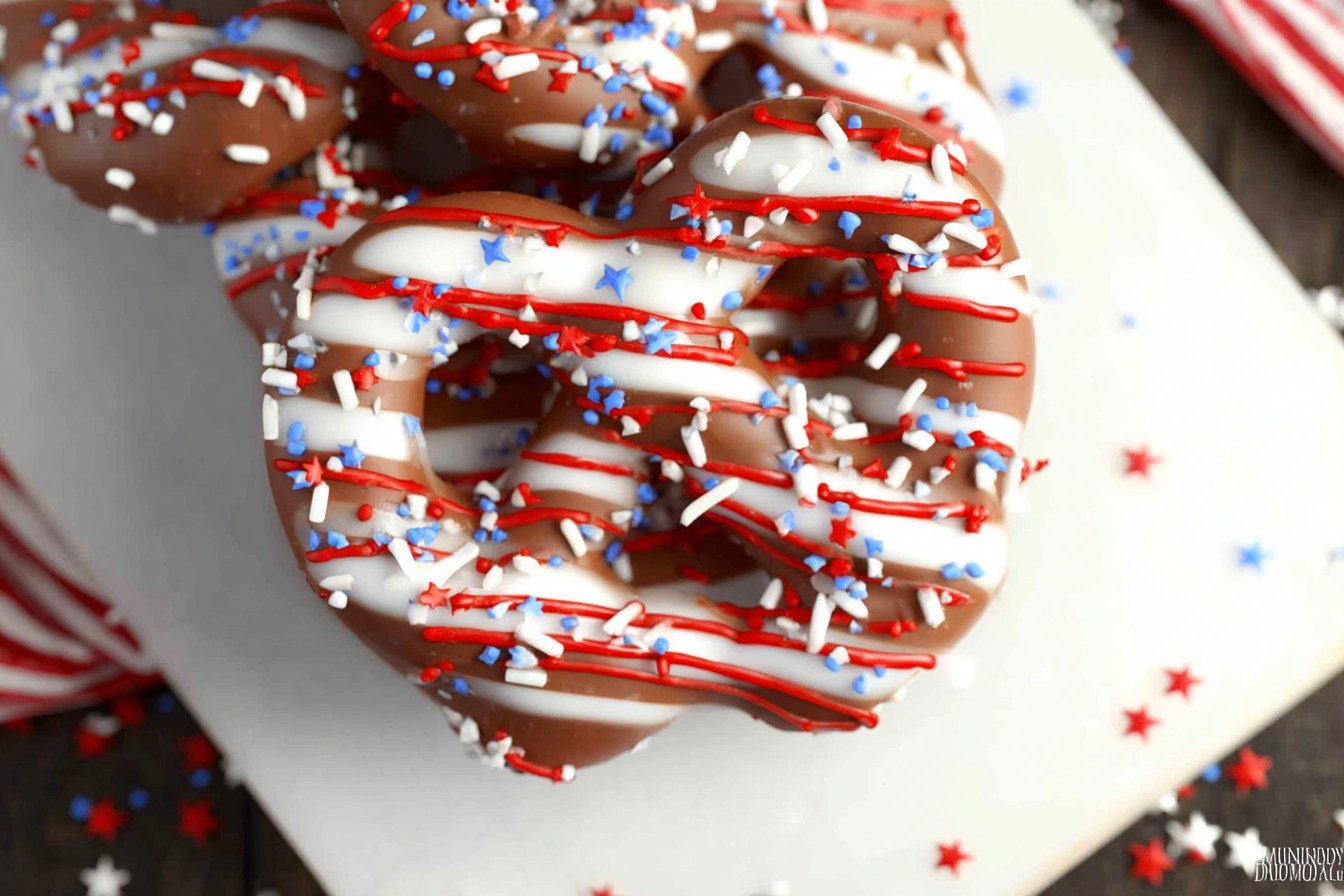
If you’re looking for a festive, fun, and super easy treat to make for your Independence Day celebrations, 4th of July chocolate covered pretzels are an absolute winner. These treats perfectly combine the salty crunch of pretzels with the creamy sweetness of chocolate, all decked out in patriotic red, white, and blue colors. Whether you’re hosting a barbecue, attending a picnic, or just craving a sweet snack with a hint of salt, these pretzels deliver big on flavor and visual appeal without requiring hours in the kitchen.
I love making these every year because they’re simple enough for anyone to tackle—even if you’re new to chocolate dipping—but they look so impressive that guests always ask where you bought them. Plus, this is a fantastic activity to do with kids or friends, turning dessert prep into a fun, hands-on project. You get to customize the colors, sprinkles, and toppings to suit your style, and they store well for snacking throughout the holiday weekend.
If you want a no-fuss yet show-stopping treat that celebrates the spirit of the 4th of July, these chocolate covered pretzels are exactly what you need. Let me walk you through everything you need to know to make them perfectly every time.
Why You’ll Love These 4th of July Chocolate Covered Pretzels
- Festive and fun — The red, white, and blue theme instantly adds holiday spirit to your dessert table or snack bowl.
- Sweet and salty combo — Pretzels and chocolate are a classic duo that balance each other perfectly.
- No baking required — Melt, dip, decorate, and you’re done—ideal for a quick and easy treat.
- Kid-friendly and creative — Kids love helping dip and decorate, making this a fun family activity.
- Customizable toppings — Use sprinkles, edible glitter, chopped nuts, or even drizzle different chocolates.
- Great for gifts or parties — Package them in cute bags for a festive gift or serve at your cookout.
- Make ahead and store well — Keep in airtight containers for several days of tasty snacking.

Ingredients for These 4th of July Chocolate Covered Pretzels
Here’s everything you’ll need to make your patriotic pretzel treats:
- Mini pretzel twists or rods — The salty crunch base that holds the chocolate coating.
- White chocolate chips or melting wafers — These melt smoothly and create the perfect creamy base for decoration.
- Red and blue candy melts or colored white chocolate — To add those iconic 4th of July stripes and designs.
- Red, white, and blue sprinkles — A festive way to finish your pretzels with color and texture.
- Optional toppings — Think crushed freeze-dried strawberries or blueberries for natural color, edible glitter for sparkle, or a sprinkle of sea salt flakes to enhance the sweet-salty contrast.
Pro tip: Look for good-quality candy melts and chocolate chips—they melt more evenly and taste better. Also, mini pretzels tend to hold chocolate better than larger varieties.
How to Make 4th of July Chocolate Covered Pretzels – Step-by-Step
Step 1: Prepare your workspace
Before you begin, line a large baking sheet or tray with parchment or wax paper. This will make cleanup super easy and give your pretzels a perfect surface to set on without sticking.
Step 2: Melt the white chocolate
Place your white chocolate chips or melting wafers in a microwave-safe bowl. Heat in 20- to 30-second bursts, stirring well between each interval. The key is to go slow so the chocolate doesn’t burn. Stir until you have a smooth, glossy coating ready for dipping.
Step 3: Dip the pretzels
Grab a pretzel with a fork or dipping tool and dip it halfway into the melted white chocolate. Let the excess drip back into the bowl to avoid thick clumps. Place the dipped pretzel on your parchment-lined tray. Repeat with all your pretzels.
Step 4: Melt the colored candy melts
In separate bowls, melt your red and blue candy melts using the same microwave method. Stir frequently to ensure smooth, lump-free melts.
Step 5: Decorate your pretzels
Use a spoon, small spatula, or piping bag to drizzle the red and blue candy melts over the white chocolate-coated pretzels. You can do stripes, zigzags, or any pattern you like—this is where your creativity shines! Immediately sprinkle on your red, white, and blue sprinkles while the candy melts are still wet so they stick well.
Step 6: Let the pretzels set
Allow your pretzels to cool and harden at room temperature, or speed things up by placing the tray in the refrigerator for 15-20 minutes. Once the chocolate is fully set, your festive pretzels are ready to enjoy!
Helpful Tips for 4th of July Chocolate Covered Pretzels
- Avoid overheating chocolate: Chocolate can seize and become grainy if heated too quickly or too much—slow and steady wins the race.
- Use good quality chocolate and candy melts: This impacts the taste and smoothness of your coating.
- Customize your toppings: Add crushed freeze-dried fruit for a pop of natural color and flavor or swap sprinkles for edible glitter to make them extra sparkly.
- Store pretzels properly: Keep your finished pretzels in an airtight container at room temperature or in a cool spot to maintain crispness. Avoid humidity to prevent melting or sogginess.
- Make it a party activity: Set up a dipping and decorating station for kids or guests to make their own personalized treats.
- Packaging ideas: If gifting, place a few pretzels in clear cellophane bags, tie with red, white, and blue ribbons, and add a festive tag for a sweet, patriotic gift.
- Try different chocolate bases: For a twist, dip some pretzels in milk or dark chocolate and decorate with the colored melts.
FAQs About 4th of July Chocolate Covered Pretzels
Can I use milk or dark chocolate instead of white chocolate?
Absolutely! Milk and dark chocolate work great as a base dip. You can still drizzle white or colored candy melts over the top for that festive look.
How long do these chocolate covered pretzels stay fresh?
Stored in an airtight container at room temperature or a cool, dry place, these pretzels stay fresh for up to a week.
Can I make these ahead of time?
Yes! You can prepare them a day or two before your event. Just keep them in a sealed container to maintain freshness.
Are these safe for kids to make?
Yes! Just supervise young kids during the chocolate melting process and handling hot bowls.
Can I freeze chocolate covered pretzels?
Freezing isn’t recommended because moisture can cause the chocolate to develop a white film and the pretzels to lose crunch. Best enjoyed fresh or refrigerated.
Final Thoughts
I make these 4th of July chocolate covered pretzels every year because they’re easy, fun, and always a huge hit. They’re the perfect combination of sweet and salty with the festive patriotic colors that bring the holiday spirit to any table. Whether you’re making a big batch for a party or a small treat just for your family, this recipe never disappoints.
Try this recipe out for your next 4th of July gathering and share your decorating photos with me—I’d love to see your creative spins! And if you have any questions or favorite tips for making chocolate covered pretzels, leave a comment below.
Happy snacking and happy 4th of July!
4th of July Chocolate Covered Pretzels
Ingredients
- 40 pretzel twists
- 1 cup white chocolate chips or melting wafers
- 1 cup red candy melts
- 1 cup blue candy melts
- Sprinkles in red white, and blue
Instructions
- Melt chocolates: In separate microwave-safe bowls, melt white chocolate, red candy melts, and blue candy melts according to package instructions.,
- Dip pretzels: Dip pretzels halfway into the melted chocolates, alternating colors for variety.,
- Add sprinkles: Immediately sprinkle with red, white, and blue sprinkles before the chocolate sets.,
- Set the pretzels: Place dipped pretzels on parchment paper-lined baking sheets and chill in the refrigerator for 15 minutes until firm.,
- Serve or store: Once set, serve immediately or store in an airtight container.,
Notes
- Use high-quality candy melts for best results and vibrant colors.
- You can drizzle contrasting colors over dipped pretzels for extra flair.
- Perfect for 4th of July parties, picnics, and BBQ side dishes.
- Store leftovers in a cool place to avoid melting.