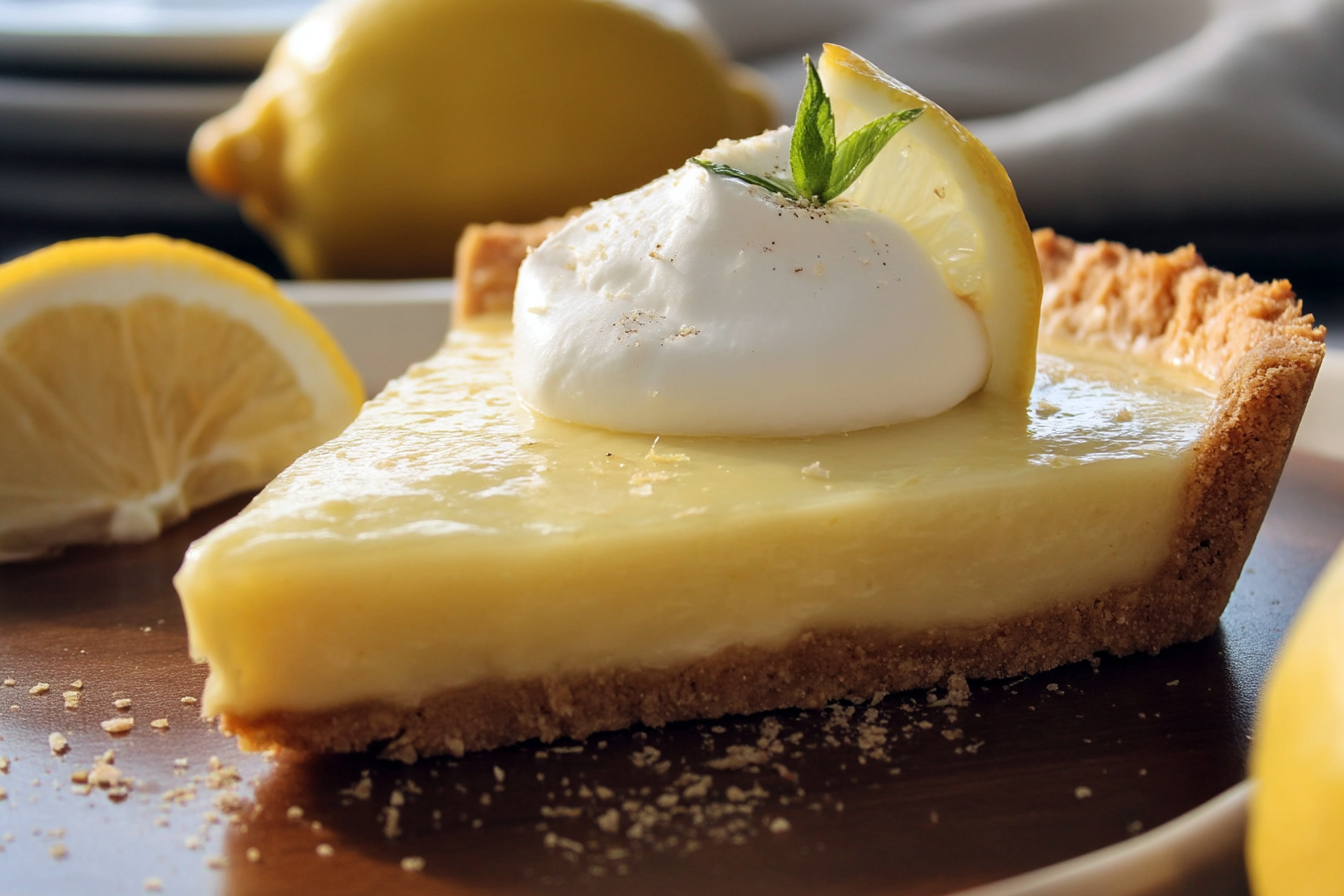
Hey, friend! Let’s chat about a dessert that’s like a burst of sunshine on a plate: Lemon Pie. This beauty is all about a buttery, flaky crust filled with a silky, tangy lemon curd that’s just the right balance of sweet and tart, topped with a cloud of fluffy whipped cream. It’s creamy, refreshing, and has that bright lemon zing that makes your taste buds dance. Perfect for spring gatherings, summer barbecues, or even a cozy winter night when you need a pick-me-up, this pie is a year-round winner. I started making this after my grandma shared her lemon pie recipe with me, and I’ve tweaked it over the years to make it super easy without losing that homemade charm. It’s become my go-to because it’s a guaranteed crowd-pleaser and feels like a little hug in every bite. Get ready to whip up this zesty delight—you’re gonna love it as much as I do!
Why You’ll Love This Recipe
This lemon pie is more than just a dessert—it’s a moment of pure joy. Here’s why it’s about to become your new favorite:
- Bright, Refreshing Flavor: The tangy lemon curd paired with sweet whipped cream creates a vibrant, uplifting taste that’s both comforting and invigorating.
- Perfect for Any Occasion: Whether it’s a holiday feast, a summer picnic, or a casual weeknight treat, this pie fits right in and steals the show.
- Crowd-Pleasing Dessert: Kids and adults alike adore its creamy texture and citrusy kick, making it a safe bet for picky eaters and dessert lovers.
- Surprisingly Easy: With a store-bought or simple homemade crust, this recipe comes together with minimal fuss—no fancy skills needed!
- Versatile and Customizable: Swap the crust, add berries, or tweak the sweetness to make it your own. It’s a canvas for your creativity.
- Make-Ahead Magic: Prep it a day ahead and let it chill, so you can focus on enjoying time with your guests or family.
- Budget-Friendly: Uses everyday ingredients like lemons and eggs, proving you don’t need pricey stuff for a showstopping dessert.

Ingredients You’ll Need
Here’s the lineup for this zesty pie—simple ingredients that come together for maximum flavor:
- Pie Crust: A pre-baked store-bought or homemade crust works great. Go for a classic pastry crust or try graham cracker for a sweeter base.
- Lemons: Freshly squeezed juice and zest are key for that bright, tangy flavor. Don’t skimp—fresh lemons make all the difference!
- Granulated Sugar: Sweetens the curd just enough to balance the tartness. It melts into the filling for a smooth texture.
- Eggs: Whole eggs and yolks create that rich, custardy lemon curd. They’re the secret to the pie’s silky consistency.
- Unsalted Butter: Adds a creamy, velvety richness to the curd. Cube it for easy melting into the warm filling.
- Heavy Cream: Whipped into a fluffy topping, it adds a light, sweet contrast to the tangy curd. Chill it for the best results.
- Powdered Sugar: A touch sweetens the whipped cream without graininess, keeping it smooth and cloud-like.
- Vanilla Extract: A splash in the whipped cream adds a warm, aromatic note that ties the dessert together.
(Note: A complete list of ingredients with exact measurements is included in the instructions section below.)
How to Make It (Step-by-Step Instructions)
Let’s get this lemon pie party started! These steps are clear and easy, with a few nudges to help you nail it like a pro.
Step 1: Prep Your Ingredients
Zest and juice your lemons, measure out your sugar, and separate your eggs (you’ll need both whole eggs and extra yolks). Cube the butter and keep it cold. If using a homemade crust, pre-bake it and let it cool. Having everything ready makes this process a breeze. Pro tip: Roll your lemons on the counter before juicing to get every last drop of juice.
Step 2: Make the Lemon Curd
In a medium saucepan, whisk together sugar, lemon juice, lemon zest, whole eggs, and egg yolks until smooth. Cook over medium heat, stirring constantly with a whisk, for 8-10 minutes until the mixture thickens and coats the back of a spoon (it should hit about 160°F if you have a thermometer). Remove from heat and stir in the cubed butter until melted and silky. Note: Don’t stop stirring, or the eggs might scramble—slow and steady wins the curd race!
Step 3: Fill the Crust
Pour the warm lemon curd into the cooled pie crust, spreading it evenly with a spatula for a smooth surface. Tap the pie gently on the counter to release any air bubbles. Cover with plastic wrap (touching the curd to prevent a skin from forming) and chill in the fridge for at least 2 hours to set. Avoid rushing this: The chilling time helps the curd firm up for perfect slices.
Step 4: Whip the Cream
In a chilled bowl, beat heavy cream, powdered sugar, and a dash of vanilla extract with a whisk or mixer until stiff peaks form, about 2-3 minutes. Be careful not to overbeat—it should be fluffy, not grainy. Keep the whipped cream chilled until you’re ready to top the pie. Tip: Pop your bowl and whisk in the freezer for 10 minutes before whipping for faster results.
Step 5: Assemble and Chill
Remove the plastic wrap from the chilled pie and spread or pipe the whipped cream over the lemon curd, creating swirls or peaks for a pretty look. If you’re feeling fancy, sprinkle with extra lemon zest or a few edible flowers for color. Chill the pie for another 30 minutes to let the whipped cream set. Note: If you’re not serving right away, keep the pie refrigerated to maintain that creamy texture.
Step 6: Serve and Enjoy
Slice the pie into wedges with a sharp knife, wiping it clean between cuts for neat slices. Serve chilled on pretty plates, and watch everyone’s eyes light up at that vibrant yellow filling. Enjoy the tangy, creamy goodness with a big smile—it’s pure sunshine in every bite! Pro tip: Let the pie sit at room temperature for 5-10 minutes before slicing for easier cutting.
Helpful Tips
Want to make this lemon pie even more of a breeze? Here are some insider tips to level up your dessert game:
- Meal Prep Like a Pro: Make the lemon curd and bake the crust a day ahead, then assemble and chill overnight. Add the whipped cream just before serving to keep it fresh and fluffy. This is perfect for stress-free entertaining or busy schedules.
- Storage Savvy: Store leftover pie in an airtight container or tightly wrapped in the fridge for up to 3 days. The whipped cream may deflate slightly, but it’ll still taste amazing. For longer storage, freeze the pie (without whipped cream) for up to 2 months—thaw in the fridge and top with fresh cream before serving.
- Reheating Not Needed: This pie is best served chilled, but if it’s been frozen, let it thaw overnight in the fridge. Avoid microwaving, as it can ruin the curd’s texture and make the crust soggy.
- Perfect Pairings: Serve with a side of fresh berries or a fruit salad for a refreshing contrast. A glass of iced tea, sparkling lemonade, or even a crisp white wine (like Sauvignon Blanc) complements the citrusy vibes beautifully. For a cozy twist, pair with a cup of chamomile tea.
- Creative Twists: Swap the crust for a gingersnap or shortbread base for a spiced kick. Add a layer of fresh raspberries or blueberries under the whipped cream for a fruity surprise. For extra zing, mix a teaspoon of lime zest into the curd or top with a drizzle of raspberry coulis.
- Lemon Sourcing: Fresh lemons are non-negotiable for the best flavor, but if you’re in a pinch, bottled lemon juice can work—just avoid the pre-squeezed stuff with additives. Meyer lemons add a slightly sweeter, floral note if you can find them.
- Crust Hacks: If making a homemade crust feels daunting, a store-bought graham cracker or pastry crust is just as delicious. To prevent a soggy crust, brush it with a thin layer of melted white chocolate before adding the curd—it creates a tasty barrier.
- Whipped Cream Variations: For a fun twist, fold in a tablespoon of lemon curd into the whipped cream for a subtle citrus boost. Or try coconut whipped cream for a tropical vibe that pairs beautifully with the lemon.
These tips should make your lemon pie adventure smooth and fun, whether you’re baking for a crowd or just treating yourself. The versatility and ease of this recipe make it a no-brainer for any dessert lover.
Frequently Asked Questions (FAQs)
Q1: Can I make this pie ahead of time?
A1: Absolutely! You can make the pie up to a day in advance and store it covered in the fridge. Add the whipped cream topping just before serving for the freshest look and texture. The curd and crust hold up beautifully overnight.
Q2: Can I freeze this lemon pie?
A2: Yes! Freeze the pie (without the whipped cream) in a freezer-safe container or tightly wrapped for up to 2 months. Thaw overnight in the fridge, then top with fresh whipped cream before serving. Avoid freezing with the cream, as it can get watery.
Q3: What if I don’t have fresh lemons?
A3: Fresh lemons are best for that vibrant flavor, but in a pinch, you can use bottled lemon juice (about 1/2 cup for 4 lemons). Skip the zest or use a teaspoon of dried lemon peel if you don’t have fresh. The flavor won’t be quite as bright, but it’ll still be delicious.
Q4: Is this recipe good for meal prep?
A4: Oh, yeah! This pie is perfect for prepping ahead. Make it the day before, chill, and you’ve got a ready-to-serve dessert for gatherings or weeknight treats. Slice it into portions for easy grab-and-go servings during the week.
Q5: How do I make this vegetarian or vegan?
A5: This pie is naturally vegetarian! For a vegan version, use a vegan pie crust (store-bought or made with vegan butter), swap eggs for a vegan curd recipe (using cornstarch and plant-based milk), and replace butter with vegan margarine. Use coconut whipped cream or a store-bought vegan whipped topping.
I make this Lemon Pie at least a few times a year, especially in the spring and summer when I’m craving something light and zesty—it’s always a hit at barbecues and family dinners! The bright lemon flavor and creamy texture make every slice feel like a special treat, and I love that it’s so easy to whip up, even on a busy day. My final tip? Garnish with a few fresh mint leaves or a handful of blueberries for a pop of color that’ll make your pie Instagram-worthy. Give this recipe a try and let me know how it brightens your day—it’s one of my go-tos for a refreshing, crowd-pleasing dessert! Drop a comment below or share a pic of your lemony masterpiece; I’d love to see your kitchen glow-up.

Zesty Lemon Pie
Ingredients
- For the Pie:
- 1 graham cracker crust 9-inch, 6 ounces
- 3 large egg yolks room temperature
- ¼ cup sour cream room temperature
- 14 ounces sweetened condensed milk 1 can
- 1 ½ tablespoons lemon zest about 2 lemons
- ½ cup fresh lemon juice about 3 lemons
- 1 teaspoon vanilla extract
- Optional Garnish:
- Whipped cream
- Lemon slices
- Lemon zest
Instructions
- Preheat the oven to 350°F (175°C).
- Unwrap the graham cracker crust and set aside.
- In a medium bowl, whisk together the egg yolks and sour cream until smooth and fully combined.
- Add in the sweetened condensed milk and lemon zest. Whisk until no lumps remain.
- Stir in the lemon juice and vanilla extract. Whisk for about 2 minutes until the mixture is smooth and thickened slightly.
- Carefully pour the lemon filling into the prepared graham cracker crust.
- Bake on the middle oven rack for 20–25 minutes, or until the pie is set on the edges and slightly wobbly in the center. The internal temperature should read 160°F.
- Remove from the oven and let cool completely on a wire rack, about 1 hour.
- Once cooled, cover the pie with plastic wrap and refrigerate for at least 4 hours, or overnight.
- To Serve:
- Top with whipped cream, lemon slices, or a sprinkle of lemon zest if desired. Slice and serve chilled.
Notes
- Use freshly squeezed lemon juice for the best flavor—bottled juice doesn’t compare.
- The pie can be made a day in advance and stored in the refrigerator.
- For extra citrus punch, add a bit more zest to the filling or as garnish.