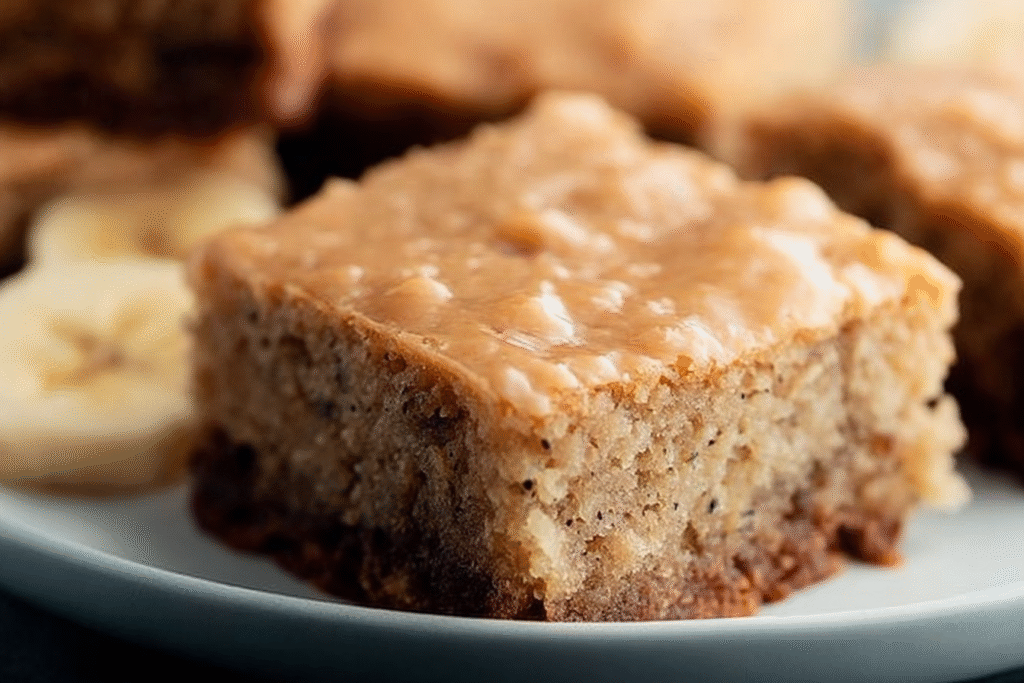
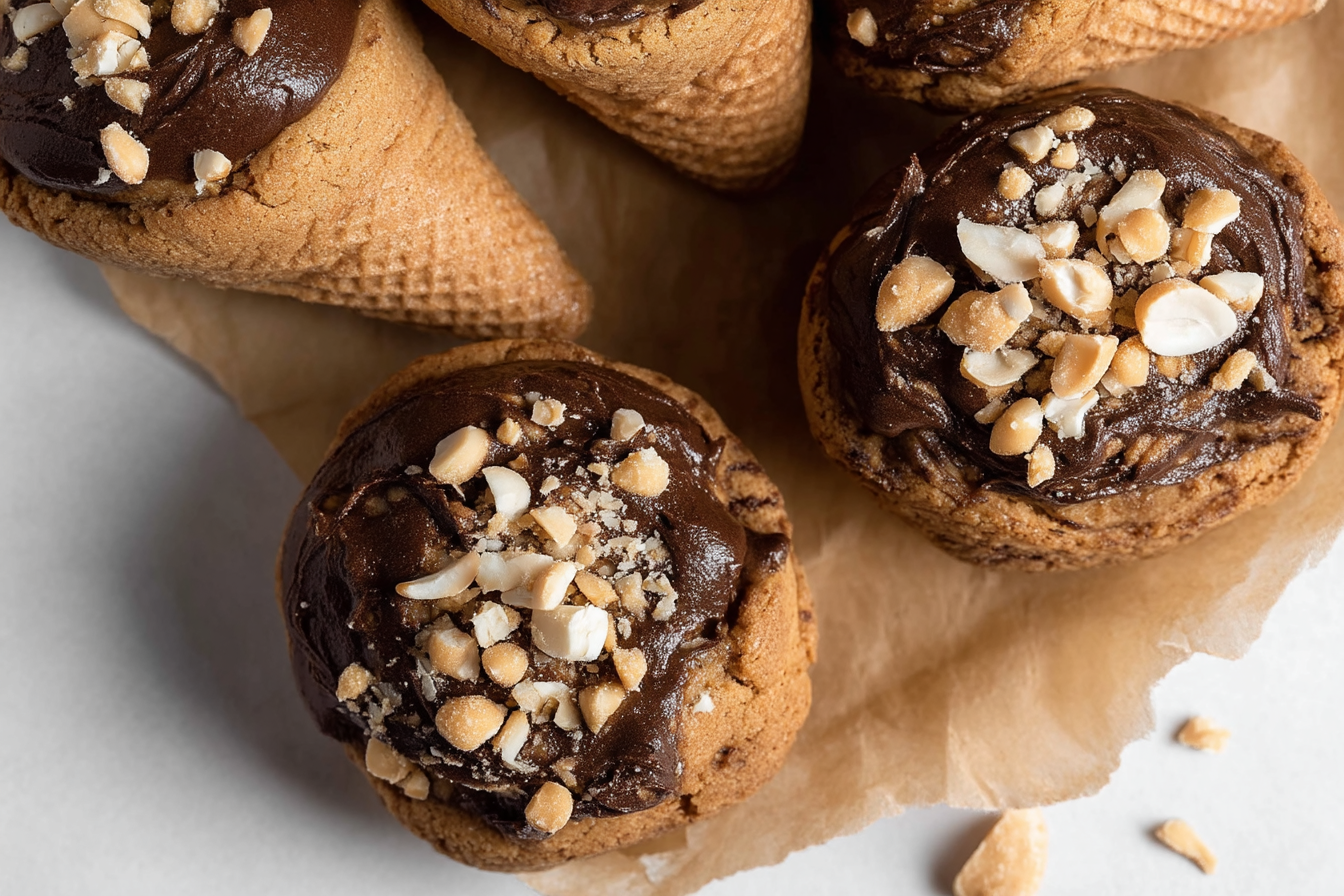
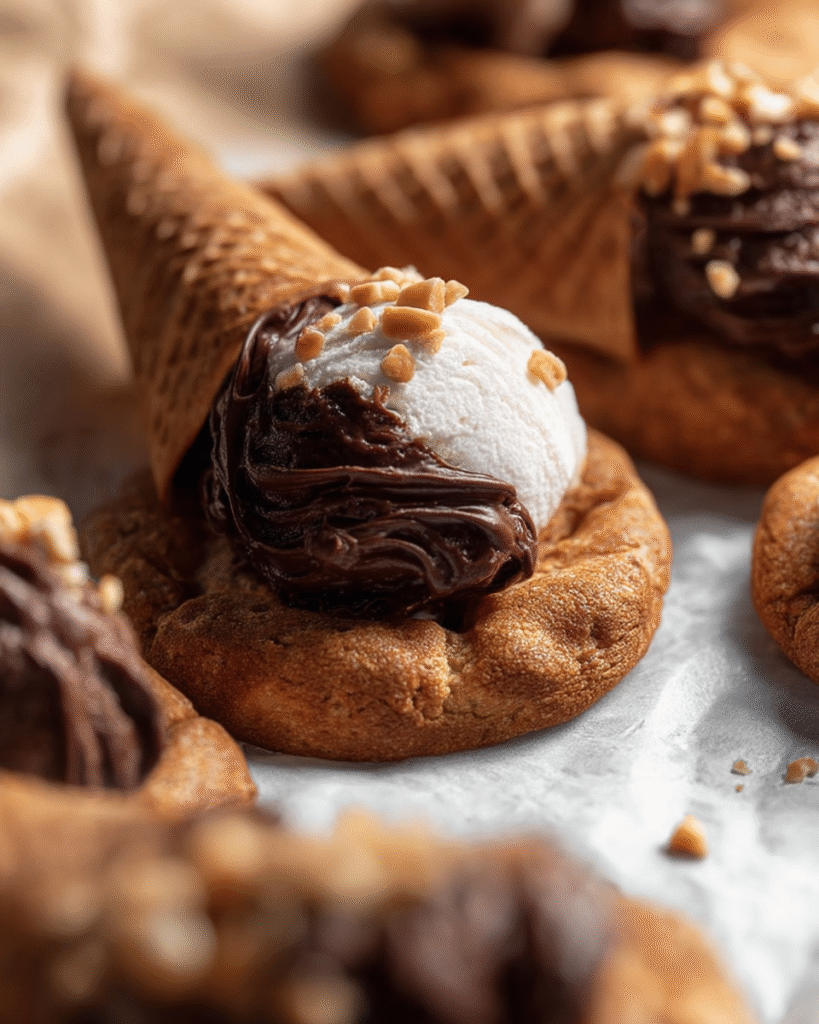
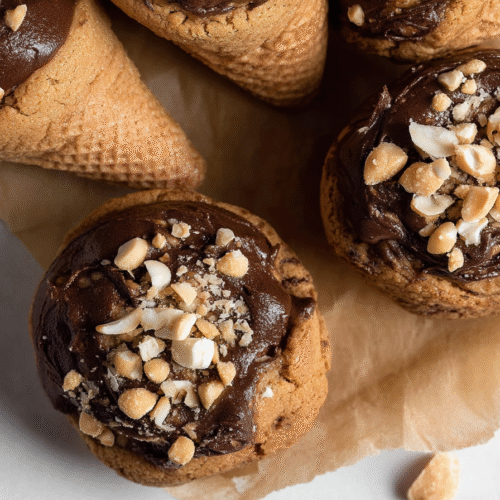
Picture this: it’s a warm afternoon, you’re craving something sweet that screams nostalgia, and you want to share a fun treat with friends or family. Enter these Gluten-Free Drumstick Ice Cream Cone Cookies! Inspired by the classic Drumstick ice cream cone, these cookies combine a buttery, gluten-free shortbread base with a creamy chocolate filling, a dip of rich chocolate, and a sprinkle of chopped peanuts for that iconic crunch. They’re sweet, indulgent, and have that perfect mix of textures—crisp cookie, smooth filling, and nutty topping. I started making these when my best friend, who’s gluten-free, kept reminiscing about Drumsticks from childhood. After some tinkering, these cookies became our go-to for movie nights, summer barbecues, or just because. They’re a hit for kids and adults alike, and they’re easier to whip up than you’d think!
Why You’ll Love This Recipe
- Nostalgic vibes: They capture the magic of a Drumstick cone in a portable, cookie form.
- Gluten-free goodness: Perfect for anyone avoiding gluten, with no compromise on flavor or texture.
- Quick to make: Ready in about 45 minutes, including chilling time.
- Kid-approved: The chocolatey, nutty combo is a crowd-pleaser for all ages.
- Customizable: Swap peanuts for sprinkles or use white chocolate for a fun twist.
- No fancy equipment: Just a mixing bowl, baking sheet, and a microwave for melting chocolate.
- Make-ahead friendly: These store well, so you can prep them for parties or snack stashes.
Ingredients You’ll Need
- Gluten-free all-purpose flour (I love Bob’s Red Mill 1:1 for a reliable texture.)
- Butter (Unsalted, softened—makes the shortbread melt-in-your-mouth tender.)
- Powdered sugar (For sweetness and a smooth cookie dough.)
- Vanilla extract (Pure extract adds a warm, cozy flavor.)
- Semi-sweet chocolate chips (For the filling and dipping—milk chocolate works too if you want it sweeter.)
- Heavy cream (Creates a silky ganache-like filling.)
- Chopped peanuts (Salted or unsalted, for that classic Drumstick crunch.)
- Salt (A pinch enhances the sweetness and balances the chocolate.)
- Coconut oil (Optional, for smoother chocolate dipping.)
(Note: A complete list of ingredients with exact measurements is included in the instructions section below.)
How to Make It (Step-by-Step Instructions)
Step 1: Mix the Cookie Dough
In a large bowl, use a hand mixer or wooden spoon to cream together ½ cup softened unsalted butter and ⅓ cup powdered sugar until light and fluffy, about 2 minutes. Add 1 teaspoon vanilla extract and a pinch of salt, then mix until combined. Gradually stir in 1 cup gluten-free all-purpose flour until a soft dough forms. The dough should be smooth but not sticky. If it’s too crumbly, add a teaspoon of milk; if too sticky, add a bit more flour. Shape the dough into a disk, wrap in plastic wrap, and chill for 15 minutes in the fridge to make it easier to handle.
Step 2: Shape and Bake the Cookies
Preheat your oven to 350°F and line a baking sheet with parchment paper. Roll the chilled dough into 12 equal balls (about 1 tablespoon each) and place them 2 inches apart on the baking sheet. Gently flatten each ball into a 2-inch circle, about ¼-inch thick, using your fingers or the bottom of a glass. Bake for 10–12 minutes, or until the edges are lightly golden. Let the cookies cool on the baking sheet for 5 minutes, then transfer to a wire rack to cool completely. Pro tip: Don’t overbake—gluten-free cookies can get hard if they go too long.
Step 3: Make the Chocolate Filling
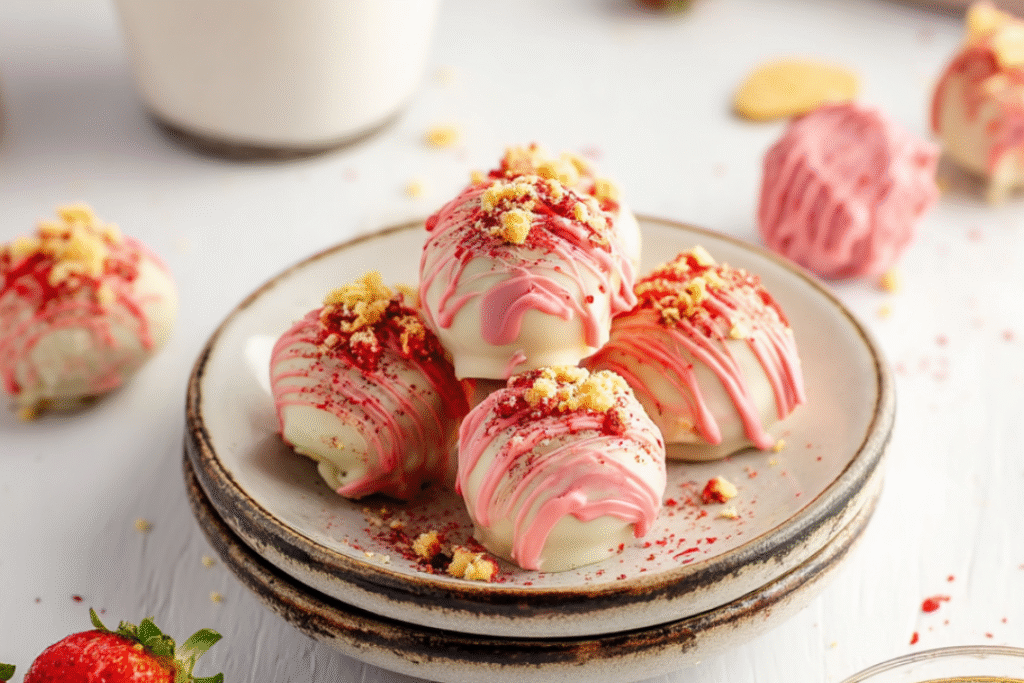
In a microwave-safe bowl, combine ½ cup semi-sweet chocolate chips and 2 tablespoons heavy cream. Microwave in 20-second bursts, stirring between each, until smooth and glossy (about 1 minute total). Let the mixture cool slightly until it’s thick but spreadable, like a ganache. If it’s too runny, pop it in the fridge for 5 minutes. This filling mimics the creamy chocolate inside a Drumstick cone, so don’t skimp on it!
Step 4: Assemble the Cookies
Spread about 1 teaspoon of the chocolate filling onto the flat side of one cookie, then sandwich it with another cookie, pressing gently to spread the filling to the edges. Repeat with all the cookies to make 6 sandwich cookies. Place them on a parchment-lined tray and chill in the fridge for 10 minutes to set the filling. This step keeps the filling from oozing when you dip them in chocolate.
Step 5: Dip in Chocolate
In another microwave-safe bowl, melt ¾ cup semi-sweet chocolate chips with 1 teaspoon coconut oil (optional, for smoother dipping) in 20-second bursts, stirring until smooth. Dip one end of each sandwich cookie into the melted chocolate, covering about a third of the cookie. Let any excess chocolate drip off, then place the cookie back on the parchment-lined tray. Sprinkle ¼ cup chopped peanuts over the wet chocolate before it sets. If the chocolate starts to thicken, reheat it for 10 seconds to keep it dippable.
Step 6: Chill and Set
Pop the tray of cookies in the fridge for 10–15 minutes to let the chocolate harden. This also helps the flavors meld together for that true Drumstick experience. Once set, they’re ready to serve!
Step 7: Serve and Enjoy
Stack these cookies on a platter for a party or tuck them into a lunchbox for a special treat. They’re best at room temperature, so let them sit out for a few minutes if they’ve been chilled. Pair with a glass of milk or coffee for maximum nostalgia. You’ll be amazed at how much they taste like the real deal!
Helpful Tips
- Make them ahead: Assemble the cookies up to 2 days in advance and store in an airtight container in the fridge. You can also freeze the baked (unfilled) cookies for up to 1 month and add the filling and topping later.
- Storing leftovers: Keep cookies in an airtight container in the fridge for up to 5 days. The chocolate and filling stay fresh, and the cookies won’t get soggy. For longer storage, freeze for up to 2 months, but add the peanut topping after thawing to keep it crunchy.
- Reheating not needed: These are best enjoyed at room temp or slightly chilled. If refrigerated, let them sit out for 10 minutes before eating for the softest cookie texture.
- Perfect pairings: Serve with iced coffee, hot cocoa, or a scoop of vanilla ice cream for an extra indulgent dessert. For a party, pair with fresh strawberries or a fruit tray to balance the richness.
- Creative twists: Swap peanuts for crushed gluten-free pretzels, rainbow sprinkles, or toasted coconut. Try white chocolate or dark chocolate for dipping. For a nut-free version, use crushed gluten-free cereal or cookie crumbs.
- Gluten-free tip: Double-check that your gluten-free flour blend contains xanthan gum for the best cookie texture. If not, add ¼ teaspoon xanthan gum to the dough to prevent crumbling.
Frequently Asked Questions (FAQs)
Can I make these ahead of time?
Yes! You can bake the cookies and store them (unfilled) in an airtight container at room temperature for up to 3 days. Make the filling and assemble the day you plan to serve, or fully assemble up to 2 days ahead and refrigerate.
Can I freeze these cookies?
Absolutely. Freeze the baked, unfilled cookies in a freezer-safe container for up to 2 months. Thaw at room temperature, then add the filling and chocolate dip. Assembled cookies can be frozen, but the peanut topping may soften, so consider adding it after thawing.
What if I don’t have heavy cream?
You can substitute with full-fat coconut milk or half-and-half for the chocolate filling, though the texture may be slightly less rich. For a dairy-free version, use coconut cream and dairy-free chocolate chips.
How do I make these nut-free?
Skip the peanuts and use gluten-free sprinkles, crushed gluten-free waffle cone pieces, or toasted coconut for the topping. Check that your chocolate and flour are processed in a nut-free facility if allergies are a concern.
Can I make these vegan?
Yes! Use vegan butter, coconut milk instead of heavy cream, and dairy-free chocolate chips. Replace the egg in the dough with a flax egg (1 tablespoon ground flaxseed mixed with 3 tablespoons water, let sit 5 minutes). The flavor will be slightly different but still delicious.
I whip up these Gluten-Free Drumstick Ice Cream Cone Cookies whenever I’m feeling nostalgic or want to make someone’s day a little sweeter. They’re such a fun project, and the payoff is huge when you bite into that chocolatey, nutty goodness. My favorite way to enjoy them is with a cold glass of almond milk and a good rom-com. Give them a try and let me know how they turn out—I’d love to hear if you added your own twist or if they brought back any ice cream truck memories!
Drumstick Ice Cream Cone Cookies (Gluten-Free)
Ingredients
- 1½ cups all-purpose gluten-free flour
- ½ cup coconut sugar
- 2 tablespoons blackstrap molasses
- 1 teaspoon baking soda
- ¼ teaspoon sea salt
- ½ cup non-dairy butter
- 2 large eggs
- 1 teaspoon vanilla extract
- ½ cup dark chocolate chips
- ¼ cup non-dairy milk of choice
- Gluten-free sugar cones crushed
- Crushed peanuts
Instructions
- Preheat the oven: Set your oven to 350°F (175°C). Line a baking sheet with parchment paper.
- Mix dry ingredients: In a large bowl, whisk together the gluten-free flour, coconut sugar, baking soda, and sea salt.
- Combine wet ingredients: In a separate bowl, beat the non-dairy butter, eggs, vanilla extract, and blackstrap molasses until smooth.
- Combine wet and dry mixtures: Gradually add the wet ingredients to the dry ingredients, stirring until well combined.
- Add non-dairy milk: Pour in the non-dairy milk and mix until the dough comes together.
- Incorporate chocolate chips and sugar cones: Fold in the dark chocolate chips and crushed gluten-free sugar cones.
- Shape the dough: Scoop tablespoon-sized portions of dough and roll them into balls. Place them on the prepared baking sheet, spacing them about 2 inches apart.
- Add peanuts: Gently press crushed peanuts onto the tops of each cookie dough ball.
- Bake: Bake for 8–10 minutes, or until the edges are golden and the centers are set.
- Cool: Allow the cookies to cool on the baking sheet for a few minutes before transferring them to a wire rack to cool completely.
Notes
- Ensure the dough and fudge are chilled to solid before assembling and baking.
- Roll the dough balls after wrapping them around the fudge to ensure even baking.
- Maintain a 3-inch spacing between cookies on the baking sheet to allow for spreading.
- Do not overbake; remove cookies when the edges are just set, and the center is slightly underbaked.
- If you prefer a crunchier texture, add the crushed sugar cones just on top before baking and omit them from the dough.